Monday 30 April 2018

Sunflower Project Tray (by Anne)


Today I am sharing a decorated recycled Balsa wood cheese tray (19 X 25cm) left over from Christmas. I needed a small project tray to collect together all my embroidery and sewing thread spools when working on one of my textile stitched paintings. I kept the 3D texture to a minimum as I didn’t want my fine threads catching and pulling on anything.

I chose one of the lovely Floral Rice Papers and the fab Duo Arty Quotes Mini Stencil from Powertex to decorate. I wanted to create something that would give me some ‘arty’ inspiration. I had a few grey board embellishments in my stash so added these too for a bit of interest.

I first used a water pen to dampen around the images enabling them to be torn and separated to form soft edged pieces that will blend into the background once decoupaged.

I coated the whole tray with Ivory Powertex and dried using a hair dryer. This provided a light background for the decoupage elements. Coating the tray with Powertex hardened up the soft Balsa wood and sealed it making it easier to keep clean too. I also coated the grey board elements with Ivory Powertex.

Decorative papers were then applied using Easy Coat Mat. Easy Structure Paste was then applied through the stencil using a recycled bank card. I also added a little more texture using a grid stencil from my stash.

The embellishments were stuck down with more Powertex and a little Easy Structure Paste where needed (i.e. onto textured areas).

In the background you can see a sneak peek of my next project in progress. I like to work on several things at once so that I don’t waste time waiting for layers to dry.

Next I used a white opaque pen (acrylic paint pen) to draw extra highlights onto the main sunflower image. Then I used the new transparent acrylic inks to brush over and add a bit of colour. These are fabulous as being transparent they don’t obliterate the layers beneath. I chose the Golden Metallic and Aqua Metallic Inks to blend in with the main colour theme of the decoupaged images and to add a little sheen. I emphasized the lettering using a brown fine tipped pen (suitable for going onto acrylic).

Where needed I also rubbed over a little more Ivory Powertex using my finger to blend in the colouring where I thought it was a bit heavy.

I also rubbed on a little gold gilding wax from my stash (Pebeo).


Finally I added a little clear PVA based glitter glue to bring a little sparkle. I just couldn’t help myself. Once dry I brushed over the whole tray with Easy Varnish.

Now I have a lovely inspirational project tray. Hope that you like it too.
Hugs all and happy creating, Anne xxx

Thursday 26 April 2018

When crafting dreams come true.......

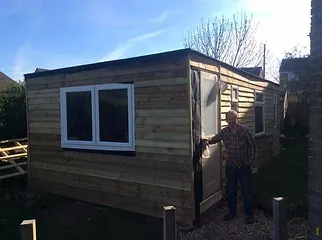
Our tutors at Powertex UK are made of strong stuff even when adversity rears it's ugly head in sad circumstances! Here is another example of how a situation can be transitional in life and you guessed it Powertex is at the forefront . What a beautiful space Shell now has to hone her skills and share her talents and knowledge with her students.

Here is her story:
Well it dawned on me the other week, (actually I had a reminder through facebook) that a year has gone by since we left with a situation that we had a couple of weeks to build my art studio.  We had a workshop booked at a venue where the business had just gone into liquidation so our options were slim as we already had people booked in. We tried a few other venues but it wasn't looking hopeful. 

Now this studio build was supposed to be a leisurely 'project' build by my partner over a few months in the summer but now I had to ask if it was even remotely possible to build my dream in the time frame we had until the workshop date or should I cancel? To be honest I wasn't hopeful at all but I'm not one who likes to cancel and let people down where I can help it, so I had to ask my man.

To my surprise he thought for a few moments and said confidently he would book the time off work and get started the next day, and so it began! 


First he asked me how big and roped it out, drew up a plan, then we ordered parts. We had a few issues with orders and deliveries but piece by piece he worked hard to support me by trying to getting it done by the dead line. Not wanting to let me down, he was up at the crack of dawn and there until late each night. He wouldn't let me lift a finger more than make him cups of tea and sandwiches. 

The base, then the frame, supports and flooring were all coming together. The roof, weather-proofing,  insulation, cladding, door and 2nd hand windows before a rush to the finish with the insulation and plasterboard interior. 

We were still loading the studio with stock and furniture up until well past midnight the night before the scheduled workshop the next day. But he did it, he pulled it off, we made the deadline!


The workshop went ahead, which I have huge amounts of gratitude to Trefor for his skills, support, time and effort he gave despite the pressure. It wasn't perfect by far, it still needed a lot of work but it was water tight safe and useable.  


A year has gone so fast and there is still landscaping around the studio to be finished as well as the odd touch up. I wanted to upcycle and reuse 2nd hand furniture where I could, add stock and storage still with a place to make art so its taken time to get there. 

But for a year now I have had this amazing space to create in, to relax in or escape in, its both a work in progress still but a blessing in disguise and yes I'm living my crafting studio dream as it came true! Find Shell at The Crafty Little Corner on her website or Facebook


 Feeling inspired by our tutors story's? Know you have what it takes to join the family and fly the Powertex banner in your area. Want to inspire, enthuse and share your knowledge? Want to make a real difference by offering an escape from life into the creative? Want to share what makes your soul tick with others? Want to engage students in your passion and watch them grow? Send us an email at info@powertex.co.uk. We'd love to hear from you. Want to go to a workshop to be inspire. Find your nearest tutor here. Toodles Anna xXx 

Monday 23 April 2018

Down the rabbit hole

I was very excited when I got to create my Alice inspired pieces because I was up in Tracey's studio at Powertex hq. I thought I had been really clever and taken step by step photos but alas no. I had not been that clever. So I will therefore walk through the steps I took to create my piece. Have you got yours yet? Find them here.


I actually started off with Ivory Powertex and gave everything a base coat. Apart from the Cheshire cat grin and the 10/6 which I coated in Black Powertex . 

TOP TIP: If you coat both the front and back pieces your working on it will help prevent warping. Being good quality mdf this is unlikely to happen but it will enable you to strenghten the piece if you are loading it up with a lot of embellishments and texture.


Once dry I placed the rice paper to the top of the hat by applying Easy Coat to the base, laying the paper and giving a liberal coat over the top. 

In the middle of the brim part of the hat I place some patterned wall paper stuck with and re-coated with Ivory Powertex.

I then dipped some stockinette into the Ivory Powertex and stuck into place on either side of the hat all the way down to the brim. I dipped some lace which I scrunched up and put in place underneath the band of the hat.

I took some Easy structure through the Alice stencil on the card shapes and the band of the hat and then applied another coat of Ivory Powertex over the top once dry. The texture on the feather was created by pulling some Easy Structure over the surface with a palette knife and then once dry was coated in another layer of Ivory Powertex.


I created the 10/6 sign by using the mdf rectangular shape as a template around some cardboard and then covering in linen which had been dipped in Ivory Powertex. I used the rose and the daisy mould to create some embellishments from stone art clay and then painted up in the Raspberry Sorbet and Orange Marmalade acrylics on the roses and the feather and the Lemon Meringue and Orange Marmalade on the daisy shapes. 


I then painted the band with the Key Lime acrylic and the base of the hat and sides with a mixture of Orange Marmalade into Raspberry Sorbet into Blueberry Pie. I also used all the colours on the words fading in and out of one another. All the pieces were then stuck down with Transparent Powertex and left to dry.


I'm really please Leonie liked my journal I thought for a moment it wouldn't be coming home with Tracey. This one was fun to create with multi-layer stenciling, on the cover and rice papers. Green and blue bisters to give it a softer finish. The rabbit uses the crackle effect you get with Ivory Powertex, brown bister and a hair dryer. I used the rice papers on the inside covers too. Hope you enjoyed the Hochanda shows, I certainly had fun creating my art to inspire. Toodles Anna xXx


Friday 20 April 2018

Simple Powertex Top Hat Project

Hi it's Kore here! I've been playing with the Wonderland products and the MDF project packs are amazing! I've used lots of bright colours in my projects with the Acrylic paints from Secret Art Loft. The colours are so vivid. I'm crazy for my pot of Orange Marmalade!


My favourite was the Top Hat set. It's a large template with lots of pieces to decorate. Did you get hold of the Top Hat set? This is how I decorated my MDF pack with Powertex products and the new acrylic paints. It's a simple project but with some fun techniques to try out.

My ingredients:


Piece of cotton fabric, long enough to wrap around the hat
Strips of fabric or t-shirt yarn for springs
2 pipe cleaners
Acrylic paints in Orange Marmalade, Raspberry Sorbet, Lemon Meringue from Secret Art Loft
Tequila Sunrise and Violet Valentine powder pigment from Secret Art Loft

This is a simple project to complete. The steps describe how to prepare all the parts separately before assembling them with Powertex.

Step 1
Prepare the base. Paint the hat base parts with Bronze Powertex and use the Powertex to stick it together. The curved pieces can be adhered front and back to attach the brim to the rest of the hat. Do one side and dry before turning over. Put this aside to dry.

Step 2
Prepare the playing cards. I used the Alice in Wonderland inspired rice paper and some Easy Coat Mat. If you want the colours of your rice paper to be bright, apply a coat of white Powertex first and leave to dry. Apply a thin coat of the Easy Coat Mat and apply the paper. I used a wet paintbrush to "draw" around the edges of the cards and also on the cut out. The wet rice paper could be torn away and smoothed with a paintbrush. Coat with another thin layer of Easy Coat Mat, smoothing the paper gently from the middle to the edges. I painted another of the playing cards with Red Powercolor mixed with Easy Varnish.


Step 3
Creating the springs. The springs are pipe cleaners twisted into spirals, although you can make them any shape you like. When they are the shape you want them use white or bronze Powertex all over the pipe cleaners and use strips of fabric to wrap around the shape.

Leave these to dry before adding your stripes (Step 5) on a craft mat or plastic bag.

Step 4
Prepare your MDF shapes. If you're adding other painted shapes, now is the time to get your colours out. I love the Secret Art Loft Acrylic paints, they blend and mix really well but the base colours are also really vivid. Paint your pieces bright colours. If you want really bright colours I recommend painting them with Ivory Powertex first. I also used some Red Powercolor and Easy Varnish to make a bright red paint for the small heart, diamond and club.
Paint the feather with Orange Marmalade and Raspberry Sorbet. I painted the letters from the MDF phrase with Raspberry Sorbet and that adorable little flamingo!


Step 5
Striped springs. You can use strips of fabric to do this or paint the stripes on with Bronze/White Powertex. Reshape if required and leave till touch dry on a craft mat or plastic bag.

Step 6
Assemble the hat. Apply Bronze Powertex to your fabric for the hat band and wrap around the join. Pleating the fabric loosely before wrapping it round the hat gives a great texture. While this is still wet you can tuck MDF pieces into it with a little Powertex and press them into place. Use Powertex to adhere your MDF pieces to the base. Tuck in the feather, a playing card, the springs and the price tag to the hat band. Stick down your other embellishments to the base. Bend your pipe cleaner springs into place.


Step 7
Adding highlights. When the Powertex is touch dry, use powder pigments to add more colour or pearl effects. I used Tequila Sunrise powder pigment and Easy Varnish to dry brush the hat band and some Violet Valentine powder pigment to highlight the letters. It's useful to have a piece of tissue or paper handy to protect other parts of the hat while you do this.


Even when this is all dry you can go back and add more embellishments and pieces as you like.

How will you decorate your project pack? Post a picture of your Wonderland inspired creation in The Powertex Studio on Facebook and see what others are creating. You can also enter your project into the April Powertex Challenge over on Instagram. Just add #12monthsofpowertex to your post to join!

Until next time, I hope you can find a little time to let your art out!
Kore x


Monday 16 April 2018

Teatime in wonderland, wearing my best hat!

Hello lovely people.
I hope you enjoyed the show on Hochanda and it has got your creative juices flowing.
I was lucky enough to try out the project packs before the show and I have to say I really enjoyed doing them.

I created the hat first as my muse was screaming at me to do that one.
Sadly I did not do step by step photos as I was way too excited to crack on and play.

I had a piece of quite chunky crochet material I wanted to use and this was just the job.
I first laid out all the parts of the kit and decided how I was going to display them, before getting out the Powertex and going for it.
My muse already knew what colour theme I was going to do, so first I painted the top hat in the BLUEBERRY PIE and MOJITO LIME
Paint and Powertexed my crochet material and laid it on the hat.

I used the green and did a bit of blending with the blueberry and dry brushed with the white pigment to highlight.
I added the rice papers to the playing cards and added texture in the form of sand balls to the top part of the cards.
I took the feather and added texture to that using stone art and Powertex and used a pokey tool to make it look like a feather, dry brushed with black.


I used more of the crochet material to the bottom part of the hat and then measured and soaked some material to give it a more 3D effect to the middle part of the hat.
I used easy 3D FLEX on the tag and gave it a crackle effect using some brown bister and added the MDF numbers and painted them with easy varnish mixed with black pigment.
And my mad hatter's hat I felt was completed.

The next kit I found more of a creative challenge and my muse was stumped on how to go about this one, I think as the rice papers are so pretty, it kind of threw me a little, as this is not more normal style!
 I sat and played around with combinations for a while until I decided upon a design my muse liked but once I started, I did not stop until it was done.

Firstly I wet ripped the rice paper, by this I mean if you dunk a fine paintbrush in water and run it around the part of the rice paper/tissue paper you want to use, it comes away quite easy and looks a better finish when laid down on a structure.
I then added lace to other parts of the teapot and cups and saucers and decoratively painted the flowers and flamingo and the little mouse on the top. I added a piece of string dipped in transparent Powertex. I painted the MDF wording in the blue paint and stuck down using Powertex as my glue.
I forgot the mention I added a few lace butterflies as well.
It turned out very pretty (for me) and I loved incorporating the rice papers into my design.
I hope all the design team blogs on this theme have inspired you all.
Until my next blog .... Go be creative

Jinny x